Building a GPU Crypto Miner
Building the GPU (Graphics Processing Unit) crypto miner is similar to building a gaming PC, with some key differences: generally, there will be a couple GPUs instead of just one and instead of having a standard computer case, miners use a mining rack (see picture below).
If this is your first time building a mining rig, stick with Hash Town and you’ll be just fine!
Here is an overview of the steps involved, which will be spelled out in greater detail later.
- Construct the mining frame
- Install the RAM (Random Access Memory), the CPU (Central Processing Unit) and the heatsink onto the motherboard.
- Mount your motherboard to the rack/case
- Mount your SSD (Solid State Drive).
- Lastly, set up your risers and GPUs. Finally, plug everything into the PSU (Power Supply).
Before we do a deep dive into the actual build, let’s discuss the basic supply list for building your rig.
Mining Frame
You’re going to need a place to mount the equipment.
We chose the aaawave mining frame for the mount because it is easy to build. They sell both a 6 GPU rack and a 12 GPU rack. For this build, we are using a 6 GPU rack.
Motherboard
The motherboard links together all of the components of your mining rig. When selecting your motherboard, keep in mind the CPU and the RAM must be compatible with your choice. They also have motherboards with varying PCIe (Peripheral Component Interconnect Express) slots for adding additional GPUs.
For example, the B250 Mining Expert motherboard has 19 PCIe slots. There are multiple motherboard options to choose from, most importantly it must have enough PCIe slots for the amount of GPUs you wish to run. Mining motherboards are geared for running multiple GPUs.
The motherboard I chose is the Z390 UD. It has 6 PCIe slots, to run the 6 GPUs that intend on running.
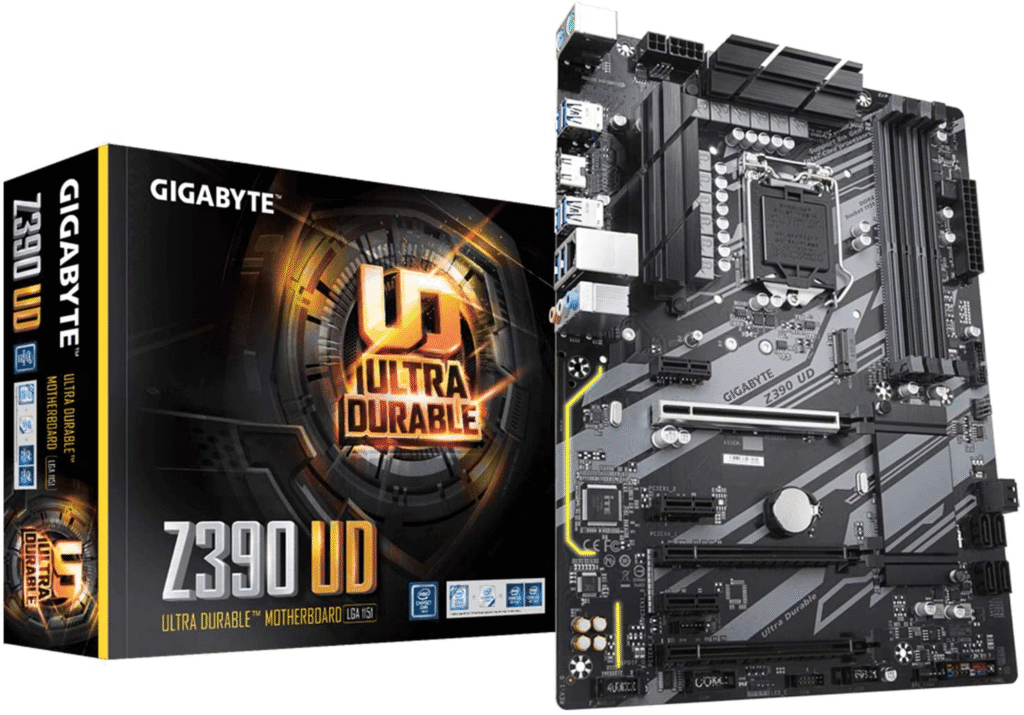
Be sure to save the manual for future reference!
RAM
Randam
Refer to the motherboard manual to check its RAM compatibility. If your motherboard has not yet arrived, you can search the internet for the motherboard manual. The most common compatible RAM type is DDR4, which is what the Z390 UD motherboard requires. The amount of RAM that you will need depends on the OS (Operating System) that you decide to use. If you will be using the Windows OS, you will need 16GB of RAM (two DDR4 sticks of 8GB each). However, if you are running a Linux OS, such as Ubuntu or HiveOS, 8GBs of RAM will do just fine.
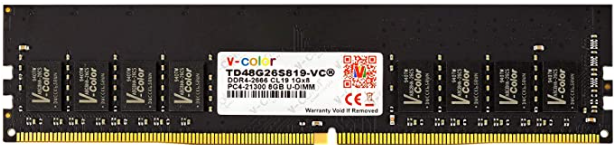
We personally bought 16GB of RAM to allow for versatility, should I ever decide to change operating systems. I chose the brand v-color for the DDR4 RAM.
CPU
Buying the CPU is really straightforward. You first need to reference back to your motherboard’s website, and navigate to the compatibility tab. The best strategy is to scroll to the bottom of the list and work your way up. Due to the current chip shortage, it is quite difficult to get the exact CPU model you may need. I would recommend starting with the Celeron’s as they will be the most affordable. If you plan on CPU and GPU mining simultaneously, go for a higher end CPU. If you are a beginner I would recommend only GPU mining at first. Do not worry about the quality of the CPU if you are only GPU mining. Don’t spend any more than $100 on a CPU, if you’re only GPU mining. I am using HiveOS, so I control the rig remotely. This means I don’t need a chip with integrated graphics. I chose the i9-9900KF. It is a really good CPU, so I could CPU mine with it in the future.
After finding the CPU you wish on purchasing, you will need a heatsink to go along with it. This is not optional, every CPU needs one, to keep the CPU cool. Again, if you are only GPU mining, you can buy a cheap heatsink. Do not just buy any heatsink. You will need to make sure it fits the CPU socket size. For example, my CPU is LGA 1151. When buying the heatsink, make sure it matches the socket size. We would never recommend the heatsink I bought for a regular PC build. But because we are building a GPU mining rig, there will hardly be any stress on the CPU. For that reason I chose this heatsink:
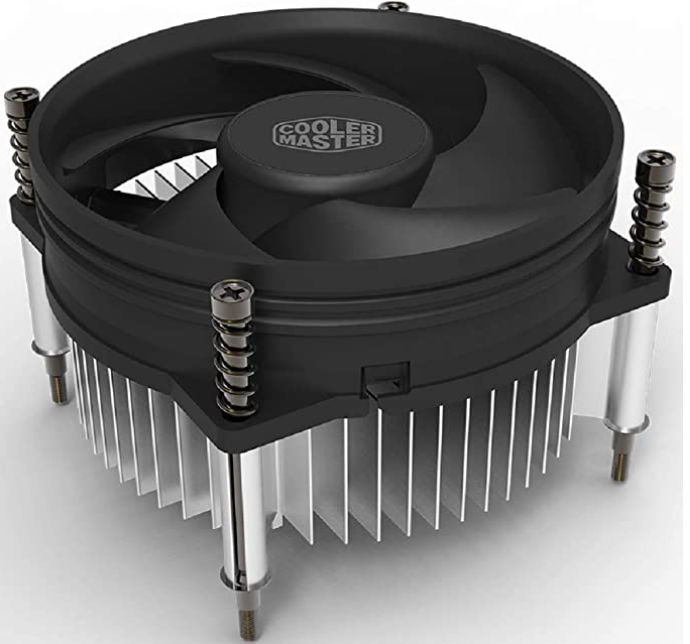
Make sure to buy thermal paste. My heatsink had thermal paste pre applied. If you plan on cleaning the rig in a couple months, you will need to reapply the thermal paste on top of the CPU. Usually on the package of the thermal paste it will say how much and what pattern to apply the paste depending on whether it is an Intel, AMD, or threadripper CPU. Noctua or Arctic are name brands for thermal paste.
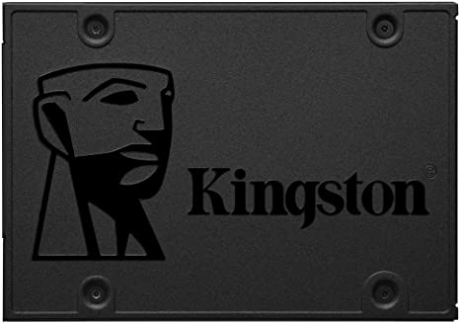
SSD
Any SSD will work. Just make sure it is SATA, and has enough storage. My SSD has 120GB. If you want to go with a name brand, you can buy Kingston. I chose PNY. You can get a Kingston SATA 3, 120GB for $23 on Amazon.
Risers
It is simply a cable extension from the motherboard to GPU. This is a little PCIe chip that has a USB port that connects to a cable, which goes to a riser, which has a 16x PCIe slot. This allows for more GPUs to fit on a computer. I liked the risers I bought from nerdgearz.com. For this rig, we will power our risers with the 4 pin molex port, so make sure your riser has that.
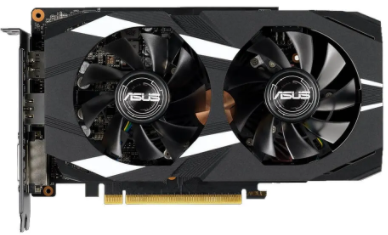
GPU
This part is tricky. The GPU market is always changing. Currently, it is very difficult to get your hands on one. Not to mention they are overpriced. You can use AMD cards and Nvidia interchangeably, but some mining software is more efficient with AMD, or Nvidia. Use whattomine.com to figure out your profitability. Or use Hashtown’s calculator (Coming Soon!). Figure out how long it will take for the card to pay itself off. If it takes longer than 12 months, it might not be worth it.
Mining with AMD and Nvidia cards are both good. Nvidia looks like a more promising future though. First, let’s talk about buying AMD cards. The best AMD cards would be any of the newest generation such as the 6900XT. Another popular choice that is more cost friendly is the RX 580. The rule of thumb is to not pay $200 over the MSRP (Manufacturer’s Suggested Retail Price). The higher end cards you buy, the rule may not apply to this. Another strategy is to buy GPUs when crypto is in a bear winter.
In regards to Nvidia, anything in the 3000 series will be promising. These cards will make a lot of profit but are difficult to get for a reasonable price. Nvidia’s classic cost friendly reliable card is the GTX 1660. Keep in mind if you can buy the super or ti version, you will get more hash rate out of it.
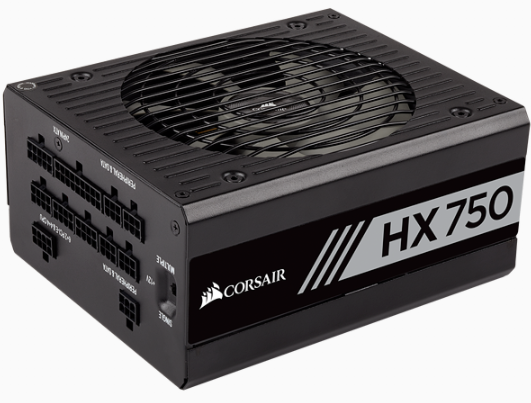
PSU
Putting extra research into buying the PSU (Power Supply Unit) is a good idea. You could either go with an ATX PSU or a server PSU along with a breakout board. The server PSU unit is good if you are using many GPUs. Higher end GPUs are going to need a LOT of power. Whereas the low end GPUs require a lot less power. I would recommend buying a high quality PSU. If you have many higher end GPUs you are going to need two PSUs. It might be easier for a beginner to start out with an ATX PSU. I would recommend the brand Corsair. Make sure to buy a higher quality one that has at least 1000 watts. If you are only running 6 or less low end cards you can get away with a 850 or 750 watt PSU. Usually the PSU will come with a lot of cables. Although we will be using molex, and if I remember correctly my PSU only came with 1 cable.
I have a 750 watt corsair PSU. It has 4, 8pin ports (one of which is occupied by the CPU power cable). The other three ports are for PCIe. That means I can have 3 GPU’s for this PSU. My motherboard and mining rack is meant for 6 GPUs. This works out well, because I will have enough ports once I buy a second PSU. For powering the riser, I am using a 4 pin molex. The other end that goes into the PSU, is a 6 pin that goes in the spot labeled ‘Peripheral & SATA’. I have 4 of these ports, one of which is being occupied by the SATA cable, going to my SSD. Overall, I am powering three risers, three GPUs, 1 CPU, one SSD, and using the 24 pin that goes to power the motherboard. When I buy the rest of my GPUs, I will have three more 8 pin PCIe ports. You can technically power 2 risers with one molex cable. This is risky and will melt over time. If you decide to do this, you will be fine if you change the cable in 6 months or so.
Closure
Hopefully now you have a good understanding of the GPU mining buying blueprint. This article is packed with information to help you pick out the perfect components to your mining rig. The total cost of everything comes to about $950 excluding GPUs. Good luck, this is where your mining journey begins!
Things to Buy:
- Rack: aaawave mining frame
- Motherboard: Z390 UD
- RAM: 2x 8GB DDR4
- CPU: Celeron
- Heatsink: Any that fits your CPU socket size
- Thermal Paste: Noctua
- SSD: 120GB Kingston
- Risers: Molex powered 16x PCIe (nerdgearz.com)
- GPU: See below options
- AMD: RX 580 8GB, or anything in latest generation
- Nvidia: GTX 1660 8GB (Ti or Super) or anything in latest generation
- PSU: Corsair HX750 watts
- Cables: 4 pin molex to 6 pin
Extra:
- Adding extra fans to the rig
- Monitor, keyboard, and mouse if using Windows or Ubuntu
- Outletstrip/surge protector
- Ethernet/LAN cable connection
- House fan
- Screwdriver/Screws (aaawave comes with a screwdriver and screws)
- SATA to USB adapter
Building Blueprint
Now that you have acquired all of the necessary parts for a GPU crypto miner, it is time to assemble all the components. Using the following steps previously mentioned above, we will successfully construct a mining rig together!
Firstly we have to build the mining frame. As I mentioned earlier, the aaawave is really good. Here is a picture of it (seen below).
Step 1. Mount the legs onto the bottom sheet of metal
Step 2. Connect the two front bars to the legs
Step 3. Connect the two back bars to the legs
Step 3. Add the four side bars (oval shaped holes)
Step 4. Add the cousioned bar across the